Mastering Mac Network Security: VPNs, Wi-Fi & Privacy in a Data-Driven World | MacWorks 360
Mastering Mac Network Security: VPNs, Wi-Fi & Privacy in a Data-Driven World
Picture this: you’re racing to finish a client presentation at your favorite coffee shop, connected to “Free_Coffee_WiFi,” when your Mac suddenly feels… exposed. That uneasy feeling? It’s your instinct telling you something important about Mac network security in 2025. The truth is, most creative professionals and small business owners running Mac fleets face a confusing landscape of security advice—some of it helpful, much of it fear-mongering, and almost none of it tailored to the real-world decisions you make every day.
Here’s what nobody tells you: network security isn’t about achieving perfect anonymity or building an impenetrable fortress. It’s about understanding what you’re protecting, from whom, and choosing the right tools for your actual risk profile—not the Hollywood hacker scenario that VPN ads love to sell you.
Whether you’re managing a creative studio’s fleet of MacBooks and iPads, running a photography business with irreplaceable client files, or simply trying to keep your small business’s Apple devices secure without hiring a full-time IT team, this guide cuts through the noise. We’ll explore what actually matters for Mac network security in 2025: the Wi-Fi protocols Apple recommends, what VPNs genuinely protect (and what they don’t), and how Apple’s built-in privacy tools like Private Relay fit into your security strategy.
No jargon, no drama—just clear guidance on protecting your Mac network in a data-driven world.
Key Takeaways
- WPA3 is now the gold standard: Apple recommends migrating all Wi-Fi networks to WPA3 Personal or WPA3 Enterprise for robust security; macOS displays “weak security” warnings for anything less than WPA2 AES[1]
- VPNs protect traffic, not everything: VPNs encrypt your connection on untrusted networks and enable secure business access, but they don’t eliminate tracking, prevent malware, or guarantee anonymity—you’re shifting trust from your ISP to a VPN provider[2]
- Private Relay ≠ VPN: Apple’s iCloud Private Relay protects Safari browsing and DNS queries from your network provider, but it won’t help you access work resources or secure non-Safari traffic[3]
- Public Wi-Fi demands caution: The real risks aren’t just “hackers”—they’re evil twin networks, hostile captive portals, and traffic interception; your iPhone hotspot is almost always safer than unknown Wi-Fi[4]
- Match controls to your risk: Baseline users need WPA3 + strong passwords; privacy-conscious users benefit from Private Relay + DNS hardening; business environments require managed VPNs and device policies[5]
Understanding Your Threat Model: Security, Privacy & Convenience in Plain English
Before we dive into protocols and settings, let’s talk about what you’re actually defending against. The term “threat model” sounds intimidating, but it simply means: What problems are you trying to prevent, and how much inconvenience are you willing to accept to avoid them?
For most Mac users running small businesses or creative studios, your real-world threats fall into four categories:
Snooping on Wi-Fi networks: Someone on the same coffee shop network is intercepting your unencrypted traffic to steal passwords, session cookies, or confidential client files. This is the classic “man-in-the-middle” scenario that gets the most attention—and it’s solved mainly by HTTPS and modern Wi-Fi encryption.
Tracking and profiling: Your internet service provider, network operator, or advertising networks are building detailed profiles of your browsing behavior, location patterns, and online activity. This isn’t necessarily “hacking”—it’s business-as-usual data collection that many users want to limit.
Account takeover: Attackers gain access to your business accounts (email, cloud storage, financial services) through credential theft, phishing, or session hijacking. Once they’re in, the damage to your creative studio or small business can be devastating.
Malware and malicious downloads: Infected files, compromised websites, or social engineering attacks that install spyware, ransomware, or other malicious software on your Mac fleet. Network security plays a role here, but it’s not the whole story.
Here’s the honest truth: no single tool solves all four problems. A VPN encrypts your traffic but doesn’t stop phishing emails. WPA3 Wi-Fi protects your home network, but does nothing to prevent tracking once your data leaves your router. Private Relay hides your IP address from websites but won’t help you access your company’s file server remotely.
The key to practical Mac network security is matching specific defenses to specific threats—and being skeptical of anyone who claims their product is a silver bullet. As we explore Wi-Fi protocols, VPNs, and Apple’s privacy features in the sections ahead, keep asking yourself: Which of my four threats does this actually address?
Wi-Fi Security Fundamentals: The Non-Negotiables for Mac Users
Let’s start with the foundation: the wireless networks your Mac connects to every day. Whether it’s your home office, creative studio, or the coworking space you frequent, Mac network security begins with choosing the right Wi-Fi security protocol.
WPA3 vs. WPA2: Why Apple Wants You to Upgrade
As of 2025, Apple’s official guidance is crystal clear: WPA3 Personal is the most secure protocol for home and small business networks[1]. Here’s what that means in practical terms.
All Mac computers from late 2013 or later that support 802.11ac or later can connect to WPA3 networks[1]. When you do, you get:
- 128-bit AES encryption for standard WPA3 Personal connections
- 256-bit AES encryption for WPA3 Enterprise 192-bit security mode on Apple silicon Macs and newer devices[1]
- Protection against offline dictionary attacks: Even if someone captures your Wi-Fi handshake, they can’t crack your password offline the way they could with WPA2
- Forward secrecy: Each session gets unique encryption keys, so compromising one session doesn’t expose past traffic
The WPA3 R3 update (introduced in iOS 16, iPadOS 16, and macOS 13) added Hash-To-Element support, Transition Terminated Indication, and protection against group downgrade attacks[1]—technical improvements that close security gaps attackers were exploiting in earlier versions.
But what if you have older devices? Apple recommends WPA2/WPA3 Transitional mode for networks that need to support both legacy and modern devices[1]. This “mixed mode” lets your newer Macs use WPA3 while older equipment falls back to WPA2. Just know that older macOS systems running OS X 10.8.5 or earlier cannot connect to WPA2/WPA3 mixed-mode networks and require a WPA2-only configuration[1].
One more important detail: WPA3 is required for Wi-Fi 6E networks operating on the 6 GHz band[1]. If you’re investing in the latest Wi-Fi infrastructure for your studio or office, this isn’t optional—it’s the price of admission.
| Protocol | Encryption Strength | Mac Compatibility | Apple Recommendation |
|---|---|---|---|
| WEP | Broken (don’t use) | All Macs | Deprecated |
| WPA | Weak | All Macs | Deprecated |
| WPA2 Personal | 128-bit AES | All Macs | Acceptable for legacy |
| WPA2/WPA3 Transitional | Mixed | Late 2013+ | Good for mixed fleets |
| WPA3 Personal | 128-bit AES | Late 2013+ | Recommended |
| WPA3 Enterprise | Up to 256-bit AES | Late 2013+ (192-bit needs Apple silicon) | Best for business |
The “Weak Security” Warning: What It Means and How to Fix It
If you’ve seen a “weak security” notification on your Mac when connecting to Wi-Fi, you’re not alone. macOS displays this warning for networks not using WPA2 AES, WPA2/WPA3 transitional, or WPA3 protocols[1].
The fix is usually straightforward:
- Forget the network in System Settings → Wi-Fi
- Reconnect and enter the password again
- If the warning persists, check your router settings and upgrade the security mode to WPA2 AES (minimum) or WPA3 (preferred)
For small business owners managing multiple locations or creative studios with guest networks, this is your wake-up call: if macOS is warning your team about weak security, it’s time to audit your Wi-Fi infrastructure.
Router Hygiene: The Boring Stuff That Actually Matters
Here’s the truth about Mac network security: your Mac can have perfect settings, but if your router is misconfigured or running outdated firmware, you’re building on quicksand.
Non-negotiable router practices for 2025:
Change the default admin password immediately after setup (attackers have databases of default credentials for every router model)
Disable WPS (Wi-Fi Protected Setup) if you’re not actively using it—it’s a known attack vector
Update router firmware at least quarterly; many routers now support automatic updates
Use a strong, unique Wi-Fi password: minimum 16 characters, mix of letters, numbers, and symbols
Disable remote administration unless you have a specific business need and understand the risks
Enable guest network isolation so visitors can’t see devices on your leading network
For creative studios and small businesses with Mac fleets: Consider enterprise-grade access points from Ubiquiti, Cisco Meraki, or Aruba that support centralized management, VLANs, and granular security policies. Yes, they cost more than consumer routers—but they also give you the control and visibility you need when you’re responsible for protecting client data and business assets.
One final note on MAC address filtering (the network kind, not the Mac computer kind): it’s often mentioned in security guides, but it provides minimal real-world protection. Attackers can easily spoof MAC addresses. It’s not harmful, but don’t rely on it as a primary defense—think of it as a “no trespassing” sign rather than a locked door.
Public Wi-Fi: What Actually Goes Wrong (And How to Stay Safer)
Let’s talk about the scenario that VPN companies love to dramatize: connecting to public Wi-Fi at airports, coffee shops, hotels, and coworking spaces. The fear-mongering is real, but so are some of the risks—we just need to separate Hollywood hacking from actual threats you’re likely to encounter.
The Real Risks: Evil Twins, Captive Portals & Hostile Networks
Evil twin networks are the most common sophisticated attack on public Wi-Fi. Here’s how they work: an attacker sets up a rogue access point with the same name (SSID) as the legitimate network—say, “Starbucks_WiFi”—and positions it to have a stronger signal than the real one. When your Mac auto-joins what it thinks is a familiar network, you’re actually connecting to the attacker’s device, which can intercept all your unencrypted traffic[4].
The scary part? Your Mac can’t tell the difference without additional verification. The network name matches, so if you’ve set it to auto-join, it will.
Captive portals (those login pages you see at hotels and airports) create another vulnerability. Legitimate captive portals are fine, but malicious ones can:
- Inject ads or tracking scripts into your browsing
- Harvest credentials if you’re tricked into “logging in” with real accounts
- Redirects you to phishing pages that look like legitimate services
Hostile network operators—whether malicious individuals or compromised infrastructure—can perform man-in-the-middle attacks, DNS spoofing, or traffic analysis even on “legitimate” public Wi-Fi. The coffee shop owner probably isn’t attacking you, but if their router is compromised or they’re using cheap equipment with default settings, you’re exposed.
What HTTPS Actually Protects (And What It Doesn’t)
Here’s the good news: most of your sensitive traffic is already encrypted thanks to widespread HTTPS adoption. When you see the padlock icon in Safari’s address bar, your connection to that website is encrypted end-to-end, even on hostile Wi-Fi[4].
That means:
Your passwords are protected when logging into websites
Your credit card numbers are safe during online purchases
Your email content is encrypted when using webmail
Your cloud storage uploads/downloads are secured
But HTTPS doesn’t protect:
DNS queries: Attackers can see which websites you’re visiting, even if they can’t see the content
Metadata: Connection times, data volumes, and traffic patterns are visible
Non-HTTPS traffic: Some older sites, apps, or services still use unencrypted connections
Your IP address: Websites and network operators can see where you’re connecting from
This is why the “public Wi-Fi will steal your passwords” narrative is outdated primarily—if you’re only visiting HTTPS sites. The problem is that many people don’t check, and some apps still use insecure connections.
The Safer Default: Prefer Your iPhone Hotspot
Here’s the practical advice that CISA (the U.S. Cybersecurity and Infrastructure Security Agency) and security professionals actually give: when in doubt, use your iPhone’s Personal Hotspot instead of unknown Wi-Fi[4].
Why? Because:
You control the password and know who has access
Cellular networks use strong encryption (4G LTE and 5G have robust security)
No captive portals or man-in-the-middle risks from compromised routers
Predictable security posture: you’re not trusting unknown infrastructure
Yes, it uses your cellular data. But for sensitive work—accessing your business bank account, uploading confidential client files, or logging into your company’s systems—the peace of mind is worth the cost. Most small business owners and creative professionals have generous data plans; use them strategically.
When you must use public Wi-Fi:
- Forget the network after each session (don’t let your Mac auto-join later)
- Avoid sensitive transactions: no banking, no confidential file transfers, no password changes
- Verify the network name with staff before connecting (to avoid evil twins)
- Use a VPN or enable Private Relay (we’ll cover both in the following sections)
- Check for HTTPS on every site you visit; consider a browser extension that forces HTTPS connections.
The goal isn’t paranoia—it’s proportional response to actual risk. Checking email on airport Wi-Fi? Probably fine with HTTPS. Uploading your creative studio’s entire client portfolio to cloud storage? Use your hotspot or wait until you’re on a trusted network.
VPNs on Mac: What They Do Well (And What They Don’t)
Now we arrive at the most oversold, misunderstood tool in Mac network security: the Virtual Private Network, or VPN. If you’ve seen ads promising “total online privacy” or “complete anonymity,” buckle up—because we’re about to separate marketing from reality.
What VPNs Actually Protect: The Honest Version
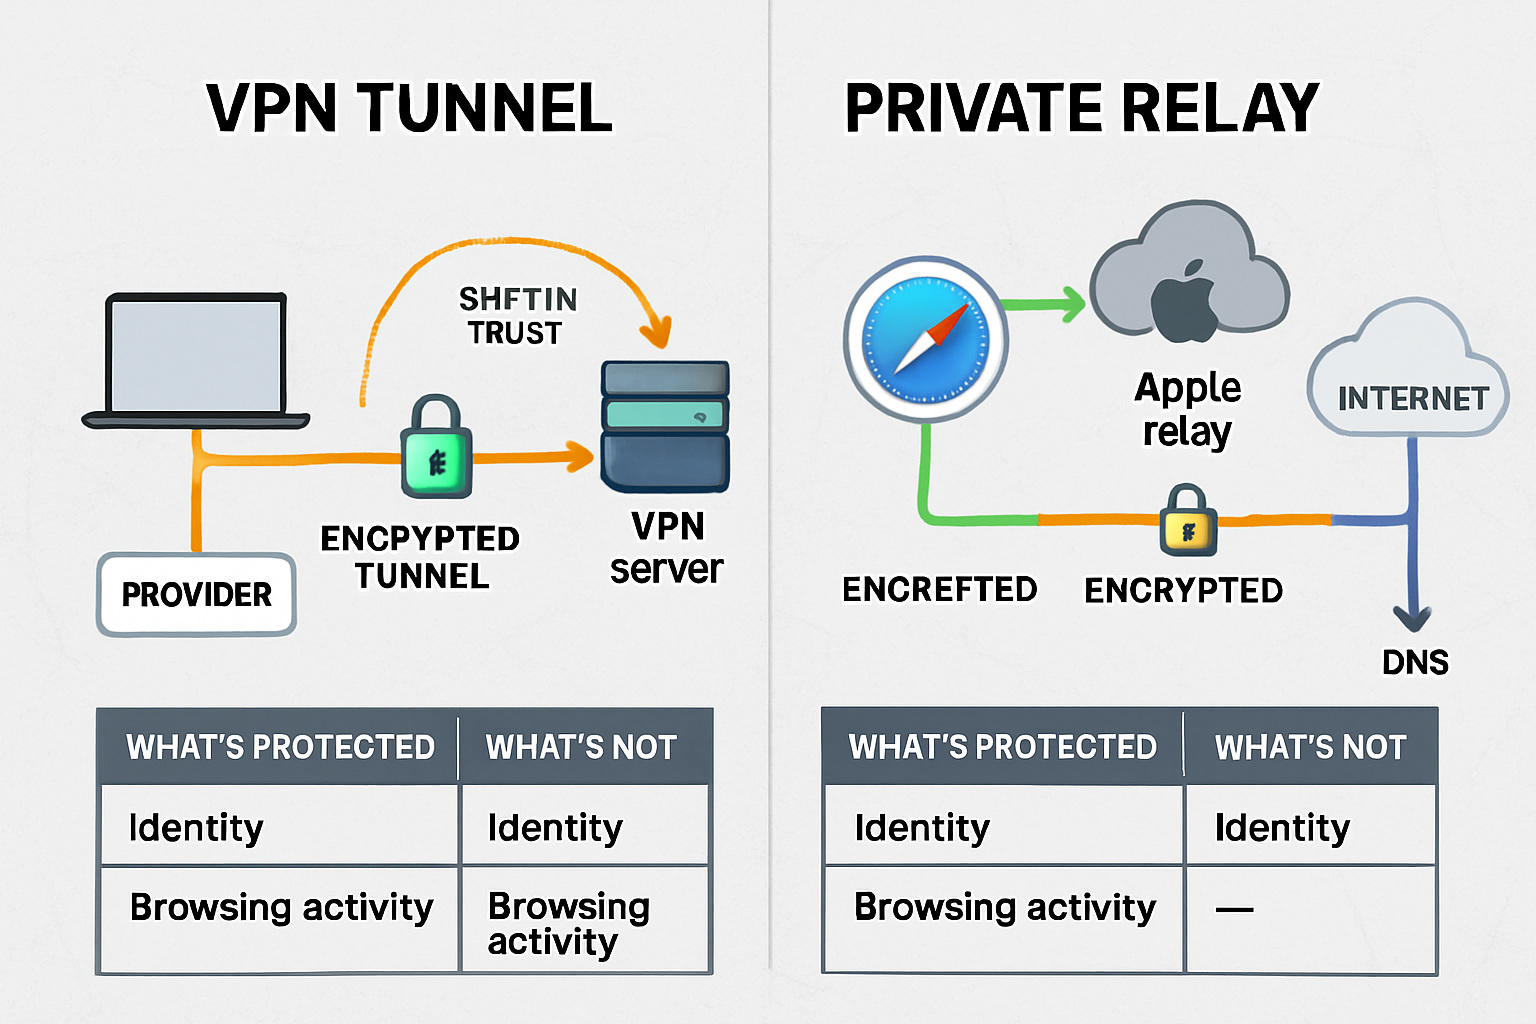
A VPN creates an encrypted tunnel between your Mac and a VPN server somewhere else on the internet. All your traffic flows through that tunnel before reaching its final destination. This provides two legitimate, valuable benefits:
1. Encryption on untrusted networks: When you connect to that sketchy coffee shop Wi-Fi we discussed earlier, a VPN encrypts all your traffic—not just HTTPS websites. This protects DNS queries, app traffic, and any legacy services that don’t use encryption. The hostile network operator can see that you’re connected to a VPN, and they can measure traffic volume, but they can’t see what you’re doing[2].
2. Secure access to business resources: If your creative studio or small business has a company VPN (using protocols like IKEv2/IPsec), it allows your remote team to access internal file servers, printers, and applications as if they were in the office. This is the killer use case for VPNs in business contexts[5].
That’s it. Those are the two things VPNs genuinely do well.
What VPNs Don’t Do: The Uncomfortable Truth
Here’s where we need to pump the brakes on VPN marketing:
VPNs don’t make you anonymous: Your VPN provider can see everything your ISP used to see—which websites you visit, when you visit them, how much data you transfer. You’ve shifted trust from your internet provider to your VPN provider. If the VPN company logs your activity (and many do, despite claims otherwise), you’ve gained nothing[2].
VPNs don’t stop tracking: Websites can still track you using cookies, browser fingerprinting, login sessions, and device identifiers. Facebook doesn’t need your IP address to know who you are if you’re logged into your account. A VPN might hide your location from websites, but it doesn’t prevent ad networks from building detailed profiles.
VPNs don’t protect against malware or phishing: If you click a malicious link or download infected software, your VPN won’t save you. Network encryption doesn’t stop endpoint attacks.
VPNs can expand your attack surface: Some personal VPN providers have questionable security practices, log user activity despite privacy claims, or have been compromised by nation-state actors. In specific threat contexts—particularly for journalists, activists, or anyone facing targeted surveillance—using a commercial VPN can actually increase risk rather than reduce it[2].
The VPN Provider Trust Problem
This is the part that VPN companies don’t advertise: you’re trusting your VPN provider with the same data you were trying to hide from your ISP.
When evaluating VPN services, ask:
🔍 Where is the company based? (Jurisdiction matters for data retention laws and government requests)
🔍 What’s their logging policy? (And has it been independently audited?)
🔍 Who owns the company? (The same parent companies own many “different” VPN brands)
🔍 How do they make money? (If the service is free, you’re probably the product)
🔍 What’s their security track record? (Have they had breaches? How did they respond?)
The uncomfortable reality is that many commercial VPN providers have business models that conflict with user privacy. Some inject ads, some sell anonymized browsing data, and some cooperate with law enforcement in ways that contradict their marketing.
This doesn’t mean all VPNs are bad—it means choose carefully and understand that you’re making a trust decision, not achieving magical privacy.
When VPNs Make Sense for Mac Users
Despite the skepticism, there are legitimate scenarios where VPNs are the right tool:
Business/organizational VPNs: If your company provides a managed VPN for accessing work resources, use it. This is a controlled environment where you know who operates the VPN and what it protects [5].
Frequent travel on untrusted networks: If you’re regularly working from airports, hotels, or international locations with questionable internet infrastructure, a reputable VPN adds a meaningful layer of protection[4].
Accessing geo-restricted content: This falls outside the security scope, but it’s a legitimate use case. Just understand that you’re not gaining privacy—you’re changing your apparent location.
Specific threat models: If you’re a journalist protecting sources, an activist facing government surveillance, or someone with a documented need for traffic obfuscation, VPNs can be part of a broader security strategy—but you need expert guidance, not consumer VPN marketing.
For the average small business owner or creative professional managing a Mac fleet? A VPN is not your first line of defense. It’s a specialized tool for specific situations, not a daily necessity for everyone.
Apple Privacy Tools That Overlap with VPN Use Cases
Here’s where things get interesting: Apple has built privacy features into macOS and iOS that address many of the same concerns that drive people toward VPNs—often with better integration, clearer trust models, and no monthly subscription fees.
iCloud Private Relay: What It Actually Does
iCloud Private Relay is Apple’s answer to privacy-conscious browsing, and it’s fundamentally different from a VPN[3]. Available to iCloud+ subscribers, Private Relay protects two specific things:
- Safari browsing traffic: When you visit websites in Safari with Private Relay enabled, your requests are routed through two separate relays. The first relay (operated by Apple) sees your IP address but not the website you’re visiting. The second relay (operated by a third-party partner) sees the website but not your IP address. Neither relay—and therefore no single entity—can build a complete picture of your browsing activity[3].
- DNS queries: Private Relay encrypts your DNS lookups so your network provider can’t see which websites you’re requesting. This closes the metadata gap we discussed earlier with HTTPS.
What Private Relay does NOT protect:
Traffic from apps other than Safari
Connections to local network devices
Access to work resources or business VPNs
Your activity when you’re logged into websites (they still know who you are)
Think of Private Relay as “VPN-lite for Safari browsing”—it’s not a comprehensive network security tool, but it’s a thoughtful privacy enhancement for everyday web use[3].
Private Relay vs. VPN: When to Use Which
Here’s the decision framework for Mac users:
| Scenario | Use Private Relay | Use VPN | Use Neither |
|---|---|---|---|
| Every day, Safari browsing at home | Yes | Overkill | Acceptable |
| Accessing work file servers remotely | Won’t work | Required | Insecure |
| Coffee shop Wi-Fi for email/web | Good option | Also good | Risky |
| Using non-Safari apps | Doesn’t protect | Protects all traffic | Depends |
| Hiding browsing from the ISP | Effective | Effective | No protection |
| Protecting against malware | No | No | Use other tools |
The key insight: Private Relay and VPNs serve different purposes. Private Relay is about privacy from network operators and website tracking. VPNs are about encrypting all traffic and accessing remote networks. You might use both in different contexts—or neither, if your threat model doesn’t require them[3].
Limit IP Address Tracking & Per-Network Controls
Beyond Private Relay, macOS offers granular privacy controls that many Mac users don’t know about:
Private Wi-Fi Address (sometimes called MAC address randomization): Your Mac can use a different hardware address for each Wi-Fi network, making it harder for network operators to track your device across locations or over time[3]. You’ll find this in System Settings → Wi-Fi → Details (for each network) → Private Wi-Fi Address.
Caveat: Some networks (especially enterprise or managed environments) use MAC address filtering for access control. If you enable Private Wi-Fi Address and suddenly can’t connect, that’s why. You can disable it on a per-network basis.
Per-network Private Relay controls: You can enable or disable Private Relay for specific Wi-Fi networks. This is useful if:
- Your work network blocks Private Relay (some corporate firewalls do)
- You need to access local network devices (printers, NAS drives) that Private Relay would hide
- You’re troubleshooting connectivity issues
Find this in System Settings → Apple ID → iCloud → Private Relay → Options → Limit IP Address Tracking[3].
These granular controls let you balance privacy and functionality without choosing between “all or nothing” approaches. For small business owners managing Mac fleets, this means you can set sensible defaults while allowing exceptions where needed.
Practical “Secure-by-Default” Setup for Mac Users: Three Levels
Enough theory—let’s build actual Mac network security configurations for three different risk profiles. Choose the level that matches your threat model and operational needs.
Level 1: Baseline Security (Everyone Should Do This)
This is the minimum viable security posture for any Mac user in 2025. If you run a small business or creative studio, this is your starting point for every device in your fleet.
Wi-Fi Configuration:
- Upgrade to WPA3: If you control your network (home office, studio), configure your router for WPA3 Personal. If you need to support older devices, use WPA2/WPA3 Transitional mode[1].
- Strong, unique passwords: Minimum 16 characters for Wi-Fi networks. Use a password manager (1Password, Bitwarden, or Apple’s built-in Passwords) to generate and store them.
- Disable auto-join for public networks: In System Settings → Wi-Fi, review your known networks and turn off “Auto-join” for coffee shops, airports, hotels, and other public locations. Make joining a conscious decision.
- Forget networks after use: When you leave a coworking space or finish travel, forget the network so your Mac doesn’t auto-reconnect later.
Router Hygiene:
- Change default admin credentials
- Enable automatic firmware updates (if available)
- Disable WPS
- Create a separate guest network for visitors
Basic Privacy:
- Enable FileVault (full-disk encryption) on all Macs: System Settings → Privacy & Security → FileVault
- Require password immediately after sleep/screensaver: System Settings → Lock Screen.
- Enable Find My Mac: System Settings → Apple ID → iCloud → Find My Mac
Estimated setup time: 45 minutes for your primary network and devices
Cost: $0 (assuming you already own a WPA3-capable router)
Maintenance: Quarterly router firmware checks, annual password rotation
This baseline won’t protect you from sophisticated targeted attacks, but it eliminates 80% of opportunistic threats and establishes a foundation for everything else.
Level 2: Balanced Privacy (For Privacy-Conscious Users)
This tier adds privacy protections against tracking, profiling, and metadata collection without significantly impacting convenience. Ideal for creative professionals handling confidential client work or small businesses in competitive industries.
Everything from Level 1, plus:
Enhanced Browsing Privacy:
- Enable iCloud Private Relay (requires iCloud+ subscription): System Settings → Apple ID → iCloud → Private Relay[3]
- Configure Safari privacy settings:
- Enable “Prevent cross-site tracking”
- Enable “Hide IP address from trackers”
- Use “Private Browsing” for sensitive research
- Consider Safari extensions like 1Blocker or Wipr for additional ad/tracker blocking
- Use Private Wi-Fi Address for non-essential networks: Enable in Wi-Fi → Details → Private Wi-Fi Address[3]
DNS Hardening:
- Configure encrypted DNS: Use DNS over HTTPS (DoH) or DNS over TLS (DoT) with a privacy-respecting resolver like Cloudflare (1.1.1.1), Quad9 (9.9.9.9), or NextDNS
- In System Settings → Network → Wi-Fi → Details → DNS, add your chosen resolver
- Or install a configuration profile from providers like NextDNS for system-wide encrypted DNS
App & Permission Hygiene:
- Audit app permissions regularly: System Settings → Privacy & Security → review which apps have access to Location, Contacts, Calendar, Photos, etc.
- Disable analytics sharing: System Settings → Privacy & Security → Analytics & Improvements → turn off “Share Mac Analytics” and “Share with App Developers”
- Seview Siri & Spotlight suggestions: Consider disabling if you don’t want Apple processing your queries
Email Privacy:
- Enable Mail Privacy Protection: Automatically enabled in Apple Mail; prevents senders from knowing when you open emails and hides your IP address[3]
- Use Hide My Email: Generate unique, random email addresses for signups and services (iCloud+ feature)
Estimated setup time: 90 minutes initial configuration, 30 minutes quarterly review
Cost: $0.99–$2.99/month for iCloud+ (includes 50GB–200GB storage, Private Relay, Hide My Email)
Maintenance: Monthly permission audits, quarterly DNS/privacy setting reviews
Level 2 strikes a balance between privacy protection and usability. You’re not hiding from nation-state surveillance, but you’re making it significantly harder for advertisers, data brokers, and network operators to build detailed profiles of your online activity.
Level 3: Business-Grade Security (For Managed Mac Fleets)
This tier is for creative studios, small businesses, and operations managers responsible for protecting company data and ensuring compliance. It assumes you’re managing multiple Macs, iPads, and iPhones—and you need standardization, auditability, and remote control without enterprise complexity.
Everything from Levels 1 & 2, plus:
Managed VPN & Remote Access:
- Deploy organizational VPN using IKEv2/IPsec or WireGuard for secure remote access to company resources[5]
- Configure VPN profiles via MDM (see below) for automatic deployment
- Require VPN for accessing internal file servers, databases, or development environments
- Use a split-tunnel VPN (only company traffic goes through VPN) to balance security and performance
- Implement zero-trust network access (ZTNA) for cloud resources: Tools like Cloudflare Access or Tailscale provide secure access without traditional VPNs
Mobile Device Management (MDM):
- Enroll all devices in MDM: Solutions like Jamf Now, Mosyle, or SimpleMDM provide centralized management for Mac/iPhone/iPad fleets
- Push security configurations (Wi-Fi profiles, VPN settings, password policies)
- Enforce encryption and firewall settings
- Deploy apps and updates remotely
- Enable remote wipe for lost/stolen devices
- Zero-touch deployment: Configure Automated Device Enrollment (formerly DEP) so new Macs arrive pre-configured and ready for users[5]
Identity & Access Management:
- Require multi-factor authentication (MFA) for all business accounts: Apple Business Manager, Google Workspace, Microsoft 365, cloud storage, and financial services
- Implement single sign-on (SSO) where possible: Reduces password fatigue and centralizes access control
- Use managed Apple IDs for company-owned devices: Separates business and personal data, enables better control
Network Segmentation & Monitoring:
- Segment networks by function: Separate VLANs for employee devices, guest Wi-Fi, IoT devices (printers, cameras), and servers
- Deploy next-gen firewall or UTM: Solutions like Ubiquiti Dream Machine Pro, Firewalla, or pfSense provide traffic inspection, intrusion detection, and content filtering
- Enable network monitoring: Track unusual traffic patterns, failed login attempts, and device behavior
Backup & Data Protection:
- Implement 3-2-1 backup strategy: 3 copies of data, 2 different media types, 1 offsite
- Time Machine to local NAS (Synology, QNAP)
- Cloud backup (Backblaze, Arq, or iCloud for business-critical files)
- Periodic offline/air-gapped backup for ransomware protection
- Test restores quarterly: Backups you haven’t tested are Schrödinger’s backups—they’re both working and broken until you verify
Policy & Training:
- Document security policies: Acceptable use, password requirements, device enrollment/offboarding procedures, incident response
- Conduct security training: Annual (minimum) sessions on phishing, password hygiene, physical security, and reporting procedures
- Establish onboarding/offboarding checklists: Ensure consistent security posture for new hires and departing employees
Estimated setup time: 8–16 hours initial deployment (depending on fleet size), 2–4 hours monthly maintenance
Cost: $4–$12/device/month for MDM + $100–$500/month for business-grade networking equipment + backup storage costs
Maintenance: Weekly monitoring, monthly policy reviews, quarterly security audits
Level 3 is where Mac network security becomes a strategic business function, not just an IT checkbox. For creative studios managing confidential client projects or small businesses handling sensitive data, this investment in proactive protection pays dividends in reduced downtime, faster incident response, and—most importantly—peace of mind.
💡 MacWorks 360 Insight: We’ve helped dozens of creative agencies and small businesses implement Level 3 security without hiring full-time IT staff. Our boutique consulting approach means you get customized infrastructure planning (Architect & Design), seamless deployment (Deploy & Deliver), and ongoing proactive support (Maintain & Support)—tailored to your actual workflow, not a one-size-fits-all prescription. With 20+ years of Mac expertise, we solve tech challenges to enable smoother workflows, securing your competitive advantage while you focus on what you do best.
Common Myths & Mistakes: What Not to Believe
Let’s debunk the most persistent misconceptions about Mac network security that we hear from small business owners and creative professionals every week.
Myth 1: “A VPN Makes Me Safe on Any Website”
Reality: A VPN encrypts the connection between your Mac and the VPN server, but it doesn’t protect you from malicious websites, phishing attacks, or malware downloads[2].
If you click a phishing link while connected to a VPN, you’re still giving your credentials to attackers. If you download ransomware, the VPN won’t stop it from encrypting your files. If you’re visiting an HTTP (non-encrypted) website, the VPN protects your traffic from your ISP and local network—but the VPN provider and anyone between the VPN exit point and the destination can still see your unencrypted traffic.
Better approach: Use the HTTPS Everywhere browser extension, verify the website’s legitimacy before entering credentials, and maintain endpoint security (antivirus, system updates, application vetting) regardless of your network connection.
Myth 2: “Private Relay Replaces a VPN for Work Access”
Reality: iCloud Private Relay and organizational VPNs serve entirely different purposes[3].
Private Relay is a privacy tool that hides your browsing activity from network operators and prevents websites from tracking your IP address. It’s designed for Safari web browsing, not for accessing internal company resources.
Work VPNs create a secure tunnel to your organization’s network, allowing you to access file servers, databases, development environments, and other resources that aren’t exposed to the public internet. Private Relay can’t do this—it doesn’t authenticate you to your company’s network or route traffic through your organization’s infrastructure[5].
Better approach: Use Private Relay for general browsing privacy and your company VPN when you need to access work resources. They’re complementary, not interchangeable.
Myth 3: “Public Wi-Fi Is Safe Because I See a Lock Icon”
Reality: The padlock icon in your browser means the connection between your Mac and the website is encrypted (HTTPS), not that the Wi-Fi network itself is secure[4].
An attacker operating an evil twin network or a compromised router can still:
- See which websites you’re visiting (via DNS queries and traffic analysis)
- Inject malicious code into non-HTTPS connections
- Perform SSL stripping attacks to downgrade HTTPS to HTTP
- Redirect you to phishing pages that also have valid HTTPS certificates (because attackers can get certificates too)
Better approach: HTTPS is essential but not sufficient. On public Wi-Fi, combine HTTPS with additional protections: use your iPhone hotspot for sensitive work, enable Private Relay or VPN, verify network names with staff, and avoid financial transactions or confidential file transfers.
Myth 4: “MAC Address Filtering Provides Strong Security”
Reality: MAC address filtering (restricting which devices can join your network based on hardware addresses) is trivially easy to bypass—attackers can observe allowed MAC addresses and spoof them in seconds.
It’s not harmful to enable MAC filtering, but don’t rely on it as a meaningful security control. It’s theater, not protection.
Better approach: Focus on strong Wi-Fi encryption (WPA3), robust passwords, network segmentation, and proper authentication mechanisms. MAC filtering can be a minor supplementary control, but it’s not a substitute for real security[1].
Myth 5: “More Security Tools = Better Protection”
Reality: Security is about appropriate controls for your threat model, not accumulating the most tools.
We’ve seen small business owners running three different antivirus programs, two VPNs, multiple DNS filters, and a dozen browser extensions—all conflicting with each other, slowing their Macs to a crawl, and creating a false sense of security through complexity.
Better approach: Choose a cohesive security strategy (like our Level 1, 2, or 3 frameworks above) that addresses your specific risks without creating operational burden. One well-configured, actively maintained security posture beats a dozen poorly understood tools fighting for resources.
Quick Checklist & Frequently Asked Questions
Mac Network Security Checklist (Print & Post)
For Every Mac User:
- Wi-Fi network uses WPA3 or WPA2/WPA3 Transitional mode
- Strong, unique password for Wi-Fi (16+ characters)
- Auto-join disabled for public networks
- FileVault (full-disk encryption) enabled
- Automatic macOS security updates enabled
- Password required immediately after sleep
For Privacy-Conscious Users (add to above):
- iCloud Private Relay enabled (iCloud+ subscription)
- Safari privacy protections configured (cross-site tracking prevention, Hide IP)
- Encrypted DNS configured (DoH/DoT)
- Private Wi-Fi Address enabled for non-essential networks
- App permissions audited quarterly
For Business/Managed Fleets (add to above):
- All devices enrolled in MDM (Jamf, Mosyle, SimpleMDM)
- Organizational VPN deployed for remote access
- Multi-factor authentication is required for business accounts
- Network segmentation implemented (VLANs for different device types)
- 3-2-1 backup strategy in place and tested
- Security policies documented and training conducted
Frequently Asked Questions
Q: What is WPA3 encryption, and why does it matter?
A: WPA3 (Wi-Fi Protected Access 3) is the latest Wi-Fi security protocol, offering 128-bit AES encryption for personal networks and up to 256-bit encryption for enterprise deployments[1]. It protects against offline dictionary attacks, provides forward secrecy (each session uses unique keys), and is required for Wi-Fi 6E networks on the 6 GHz band. Apple recommends migrating all Wi-Fi implementations to WPA3 for robust security[1].
Q: Do I really need a VPN if I’m browsing at home?
A: Probably not. At home on a trusted WPA3 network, HTTPS already encrypts your sensitive traffic to websites. A VPN would add privacy from your ISP (they couldn’t see which sites you visit), but for most home users, this isn’t a critical threat[2]. VPNs are most valuable for accessing untrusted public Wi-Fi or for remote work [4][5].
Q: What’s the difference between iCloud Private Relay and a VPN?
A: Private Relay protects Safari browsing and DNS queries by routing them through two separate relays so no single entity can see both your identity and your browsing activity[3]. VPNs encrypt all your Mac’s traffic and route it through a VPN server, allowing access to remote networks. Private Relay is privacy-focused and Safari-only; VPNs are security-focused and system-wide. Use Private Relay for everyday browsing privacy and VPNs for work access or untrusted networks[3][5].
Q: How do I know if my Wi-Fi network is secure?
A: On your Mac, go to System Settings → Wi-Fi, click the Details button next to your connected network, and check the “Security” field. You want to see “WPA3 Personal,” “WPA2/WPA3 Personal,” or “WPA2 Personal (AES)” at minimum[1]. If you see a “weak security” warning or protocols like WEP or WPA, your network needs to be upgraded immediately.
Q: Should I use a free VPN?
A: Generally, no. Free VPN providers need to monetize somehow—often by injecting ads, selling anonymized browsing data, or using your device as an exit node for other users’ traffic[2]. If you need a VPN, invest in a reputable paid service with a clear privacy policy, independent audits, and a trustworthy jurisdiction. Better yet, use your organization’s VPN for work access and Private Relay for general browsing privacy.
Q: Can I use WPA3 with older Macs and iPhones?
A: All Mac computers from late 2013 or later with 802.11ac or later support can connect to WPA3 networks[1]. For iPhones, models from iPhone 7 or later support WPA3[1]. If you have older devices, use WPA2/WPA3 Transitional mode on your router—newer devices will use WPA3 while older ones fall back to WPA2[1].
Q: What should I do if I accidentally connect to a malicious Wi-Fi network?
A: Immediately disconnect, forget the network (System Settings → Wi-Fi → Details → Forget This Network), and change passwords for any accounts you accessed while connected—especially if you entered credentials on non-HTTPS sites[4]. Monitor your accounts for suspicious activity and consider enabling multi-factor authentication if you haven’t already. If you handled sensitive business data, notify your IT team or security consultant.
Q: How often should I update my router firmware?
A: Check for router firmware updates at least quarterly, or enable automatic updates if your router supports them. Router vulnerabilities are regularly discovered, and outdated firmware is a common entry point for attackers. Set a calendar reminder or make it part of your quarterly security review.
Conclusion: Choose Controls Based on Your Risk, Not Vibes
Here’s the truth about Mac network security in 2025: there is no one-size-fits-all solution, no magic bullet, and no product that eliminates all risk. What works for a freelance photographer working from coffee shops is different from what a creative studio with 15 employees and confidential client data needs.
The key is matching specific defenses to specific threats:
Baseline security (WPA3, strong passwords, FileVault, auto-join discipline) protects against opportunistic attacks and establishes a foundation for everything else.
Privacy enhancements (Private Relay, encrypted DNS, tracker blocking) reduce profiling and metadata collection without significant inconvenience.
Business-grade controls (MDM, organizational VPN, network segmentation, backup strategies) provide the standardization, auditability, and remote management that Mac fleets require.
Don’t let fear-mongering drive your decisions. Public Wi-Fi isn’t a guaranteed attack vector if you take basic precautions. VPNs aren’t privacy panaceas—they’re specialized tools for specific scenarios. Private Relay isn’t a VPN replacement; it’s a complementary privacy feature for Safari browsing.
Start with the fundamentals: upgrade to WPA3, use strong, unique passwords, enable FileVault, and disable auto-join for public networks. These simple steps eliminate the vast majority of common threats.
Then layer in privacy if your threat model warrants it: Private Relay for browsing privacy, encrypted DNS to prevent ISP snooping, and careful VPN selection for untrusted networks.
Finally, scale to business-grade if you’re managing a Mac fleet: MDM for standardization, an organizational VPN for secure remote access, network segmentation for defense-in-depth, and proactive monitoring for early threat detection.
The goal isn’t perfect security—it’s proportional security that protects what matters without grinding your workflow to a halt.
Your Next Steps
If you’re a solo Mac user or small team:
- Audit your current Wi-Fi security (check for WPA3 support and upgrade if needed)
- Enable FileVault and automatic security updates on all Macs
- Subscribe to iCloud+ and enable Private Relay for everyday browsing privacy
- Establish a backup routine (Time Machine + cloud backup minimum)
If you’re managing a creative studio or small business Mac fleet:
- Document your current security posture (network protocols, backup status, access controls)
- Implement Level 2 or Level 3 controls based on your risk profile
- Evaluate MDM solutions for centralized management and zero-touch deployment
- Establish security policies and conduct team training
If you need expert guidance:
MacWorks 360 has spent 20+ years helping creative professionals, photographers, and small business owners architect secure, reliable Mac infrastructures without enterprise complexity. We don’t offer prescriptive solutions—we craft customized plans that match your actual workflow, risk tolerance, and budget.
Whether you need a one-time security audit (Pay-As-You-Need) or ongoing proactive support with priority response times (Managed Program), we solve tech challenges to enable smoother workflows. From initial architecture and design through deployment and long-term maintenance, we’re your boutique IT consulting partner for peace of mind through technology solutions.
Ready to secure your Mac network the right way? Contact MacWorks 360 for a practical assessment with educational value—because reliable systems and proactive risk management shouldn’t require a full-time IT team.
References
[1] Apple Support. (2025). Recommended settings for Wi-Fi routers and access points. Retrieved from https://support.apple.com/en-us/102393
[2] Cybersecurity and Infrastructure Security Agency (CISA). (2024). Using Virtual Private Networks (VPNs). Retrieved from https://www.cisa.gov/news-events/news/using-virtual-private-networks-vpns
[3] Apple Support. (2025). Use iCloud Private Relay on all your devices. Retrieved from https://support.apple.com/en-us/102602
[4] Cybersecurity and Infrastructure Security Agency (CISA). (2024). Securing Wireless Networks. Retrieved from https://www.cisa.gov/news-events/news/securing-wireless-networks
[5] Apple Platform Security. (2025). VPN overview. Retrieved from https://support.apple.com/guide/security/vpn-overview-sec21d75f06a/web